Over a quarter of hardcore Gen Z vinyl fans pick up new records at least once a month. Vinyl has made an epic comeback, and that’s not even considering every other age group who still love flipping through secondhand copies in coffee shop record stores across the world.
Why, you may ask?
Because there truly is a massive difference between playing a Spotify song on your Amazon Echo and hearing it the way it was meant to sound on real vinyl.
While the ease of putting a record down, dropping the needle, and pressing play seems simple enough, it can lead to distorted sound or worn records.
Learning how to use a record player ensures you get the best possible experience by understanding what’s happening mechanically and electronically in your unique setup.
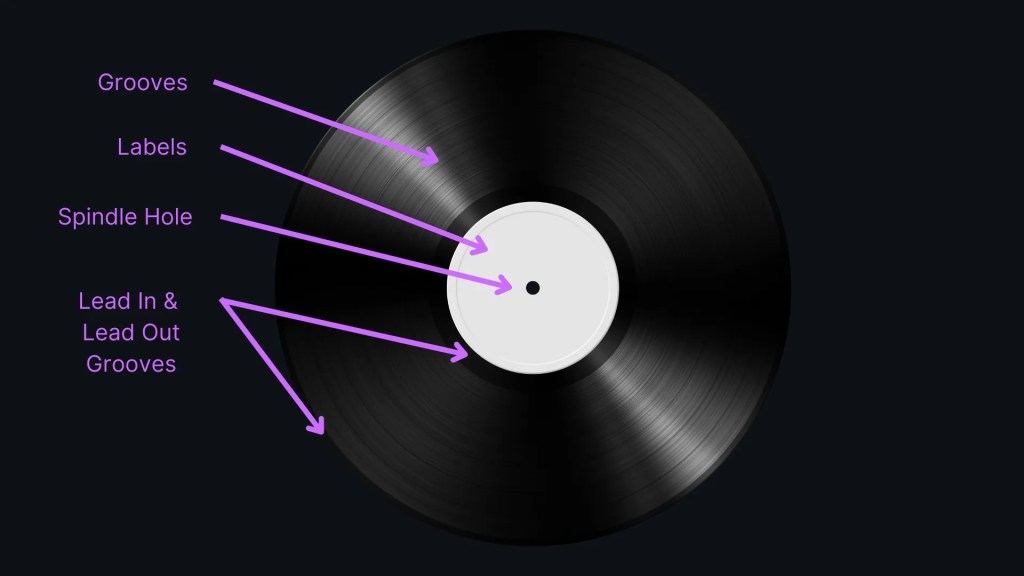
Vinyl playback is a physical ritual. A diamond stylus rides inside microscopic grooves, turning those tiny vibrations into electrical signals that serenade your soul from Sister Rosetta Tharpe’s Gospel Train to hearing Harry Styles’ Kiss All the Time.
Whenever something in that chain goes wrong, you hear it immediately. You want your records to last for decades, with sound that’s full, warm, and detailed. Here’s how to do it right.
Table of Contents
In this guide, we’ll cover everything you need to know about the how to use a record player into the following sections:
- Before You Press Play: What You Actually Need
- Make Sure Your Setup Is Actually “Set Up” Correctly
- How to Handle Records
- How to Place Records on the Turntable
- Beginner Mistakes That Damage Records (and Sound Worse)
- Building Confidence with the Right System
Affiliate Disclosure: We’re a small team of vinyl enthusiasts – if you get value from our insights, using our affiliate links (including Amazon Associates) helps us earn a commission and keep the lights on at no extra cost to you. Thank you for supporting Recordbuilds.com!
Before You Press Play: What You Actually Need
Every vinyl system follows a pretty similar path. You could spend $150 on a suitcase record player or $3,000 on an elite setup, but it still follows the same basic idea: a turntable with a phono preamp feeding an amplifier to deliver sound to your speakers. That signal chain is the very foundation of how to use a record player.

So, why is it called a turntable? As you spin (turn) the record, the tonearm and cartridge control the stylus that reads the grooves on the vinyl’s surface. A tiny electrical signal is produced from the stylus, something way too weak to power the speakers alone.
The phono preamp boosts that delicate signal to what is called the “line level.” The amplifier picks up that signal and makes it stronger, so when it comes out of your speakers, you bathe in the warm sound waves of Billie Eilish, Queen, Bob Dylan, or the Rolling Stones.
No matter how you mix and match your components, that signal path stays unchanged. That’s why using something like our Builder comes in handy to find the right setup for your listening pleasure and local environment.
Without a good system that follows that path, you run into compatibility problems where the phono and line inputs won’t coordinate, or the power doesn’t meet minimum needs. Having a way to find those ideal setups using our builder alleviates mistakes from generic “top 10” gear lists or from having to hunt through audio forums where insider terminology is way too overwhelming.
Make Sure Your Setup Is Actually “Set Up” Correctly
When you have compatible gear, it sounds amazing. A record player gives you a warmer, more dynamic sound. You can hear the mastering choices artists and producers made, without the endless compression introduced by digital conversions. Precision in your setup matters. Small adjustments will affect the clarity of your records, channel balance, and durability.
Turntable Setup
Start with your player. You want a dedicated space in your home, office, or apartment. Find a stable, level surface with plenty of airflow around the player. If the space is uneven, you can expect your tonearm to apply inconsistent pressure, which will put way more wear and tear on your record.
A level tool or your smartphone’s built-in app will help ensure everything is stable. Plenty of turntables come with small adjustable legs at the corners that help you get to a perfect level.
You also want to keep your setup away from subwoofers or large speakers. If the surface vibrates easily, you may experience acoustic feedback or muddy bass from a low-frequency rumble. Some turntables also include a built-in preamp that you’ll want to check is switched on or off before connecting to an amplifier. That misconfiguration is a pretty common cause of bad sound quality.
We have setup guides that will help walk you through making sure you’ve got a solid foundation for your particular turntable.
Speaker Placement
Even the best records carefully preserved and used on the most high-end turntables cannot compensate for poor speaker positioning. Where you place your speakers impacts bass response, stereo separation, and what you end up hearing.
Try to form a triangle with the speakers and your ideal listening position. You should match the distance between the speakers with your sitting point. If you have tweeters, sit them at ear height when you’re seated. Angle all your speakers slightly inward (known as toe-in) to sharpen the stereo imaging.
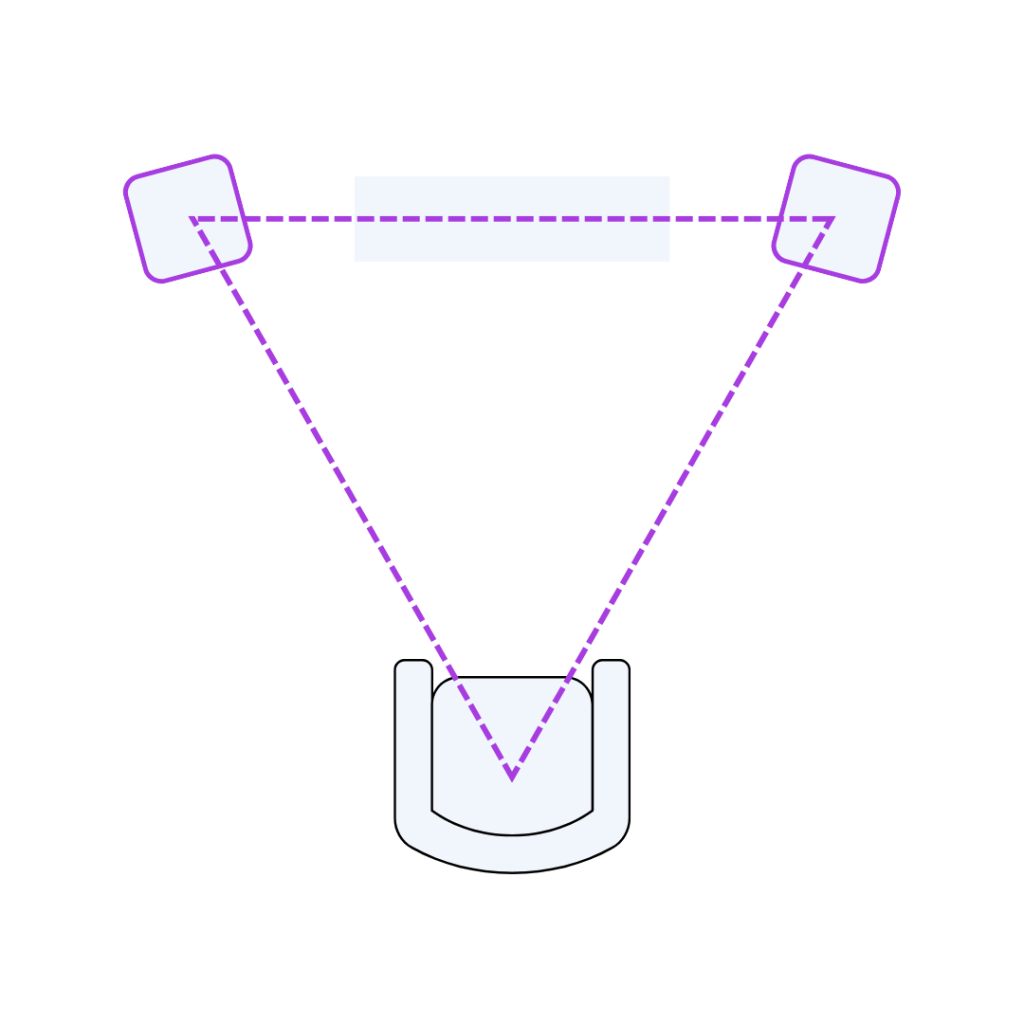
Whenever you don’t have much space, try to avoid placing the speakers against a wall. Good speakers need room to prevent boomy bass. Even pulling them away from the wall by 5-7 inches can make a massive difference.
Cartridge Alignment
Your cartridge is the space where your sound lives or dies. If you hear distortion, it’s because your cartridge is misaligned. This means you want the stylus to track the grooves at the best angle across the entire record surface. You can print a protractor or use a mirrored protractor tool (grid) to find that alignment.
The goal is to have the cartridge sitting square in the “headshell,” with the stylus tip aligned with your reference points. For factory-installed cartridges, be sure the mounting screws are tight, and nothing shifted around during shipment to your home.
How to Handle Records
Cultivating a record collection is wonderful. It’s like having a premium wine collection or a diverse selection of hot sauces. A good collector knows that how you handle those records matters. You don’t want a scratch or a fingerprint to impact what you hear.
How to Hold a Record
Let’s start with the basics of how to use a record player, which begins with holding the record itself. You pick up the record by the outer edge (Lead In Grooves) and label center, avoiding touching the grooved surface. Any oil or dust on your fingers can accumulate, contributing to surface noise or stylus issues.
Why Fingerprints Matter
Remember that vinyl playback is mechanical, not digital. You’ve already worked hard to align the cartridge. A modulation as thin as a human hair from oil or debris filling in the groove because of your fingerprints forces the stylus to vibrate in a “weird” way. That vibration is why you hear so many secondhand records with crackles, hissing, or distortion.
Dry Brush Routine
An excellent ritual to adopt is using a carbon-fiber brush to clean the record before and after each use. You put the record down on the platter and lightly hold the brush across the grooves for several rotations, sweeping the dust toward the outer edge and lifting up off the record. That habit removes surface debris and reduces static.
If you need to go a little deeper with your cleaning, like if your uncle picked up an original Springsteen and it needs some attention, use a gentle record-cleaning solution and a microfiber cloth.
Storage Basics
There are endless TikToks for record storage aficionados. What you should see is a collection stored vertically, not stacked horizontally, which can warp the record.
Use anti-static sleeves on the records and store everything in a cool, dry space away from direct sunlight. You also don’t want to be too close to a fireplace, as heat can cause warping, high humidity can cause mold, and not using a cover sleeve can damage playback quality.
If this you want to full lowdown on all things vinyl storage, from budget options, to boutique picks, and even free DIY options check out our vinyl record storage guide.
How to Place Records on the Turntable
Learning how to use a record player often comes down to placing the record on the turntable. Different devices impact how you listen to Nirvana’s Nevermind or Ani DiFranco’s Little Plastic Castles.
Automatic Turntables
An automatic record player is a good entry-level choice. All you do is place the record on the platter, set the speed (33 1/3 or 45 RPM most of the time), and press the start button. The player will move the tonearm on its own, lowering it to where the record sits. Just be sure that the arm doesn’t lower too quickly so it won’t damage your record.

Manual Turntables
For those antique collectors testing out Taylor’s Version of 1989 on a manual turntable, you need a bit more precision. Place the record gently down, select your speed, and manually lift the tonearm using a cue lever. You want to move it over the lead-in groove at the outer edge of the record and lower it slowly until it gently settles.

Try not to pick up or drop the needle by hand. The sudden impact can chip the stylus or scar the groove. You should also use the tonearm lock between plays to prevent accidental dropping. You end up with more control, but also a lot more risk, so take your time to get it right.
Beginner Mistakes That Damage Records (and Sound Worse)
Now that you’ve got the basics of how to use a record player down and want to dig deeper into your parents’ collection of movie soundtracks like The Goonies or Footloose, you should be aware of some beginner mistakes. These are things that even the most diehard fan can do without meaning to:
- Wrong Input: Mismatching the phono and line inputs often occurs when the built-in preamp is connected to an amplifier, amplifying the signal twice. That results in distortion and harsh clipping. Always check the preamp or input type before spinning a record or buying components.
- Incorrect Tracking: You need to know how much force is applied to the stylus while in the groove. Too light and it skips. Too heavy, and it grinds. Some devices will have “anti-skate” protection that matches tracking force to ensure consistent pressure across both groove walls.
- Playing Dirty Records: This is the most common problem. You pick up a dusty copy of Abbey Road from 1969, only to leave the dust in place, damaging the record and ruining the sound. You need to clean your records with a quick brush, especially before that first play.
- Using a Dirty Stylus: That cleaning habit also applies to your stylus. Buildup on the tip can affect sound quality and record longevity. Use a stylus brush or gel cleaner to keep that thing beautiful. Always brush from back to front. Never side to side.
Avoiding these easy-to-make mistakes ensures you get the most value and sound from your record player. A little extra TLC goes a long way to experiencing music as it was meant to be heard.
Building Confidence with the Right System
When you understand how to use a record player, you unlock a new world of sound and emotions that others never experience. You need to be sure you’re getting the right setup so any distortion, debris, or bad habits stay out of the soundscape equation.
To solve all the headaches that come along with actually buying (or upgrading a vinyl setup) use our free Setup Builder tool to match components and assembling a system that actually fits what you need.
There is also a huge setup library with comprehensive listening room profiles – so you can share your setup with a simple link and view other people’s setups, parts, cost, a few images, and personal ratings.
At the end of the day, owning vinyl means you care. It means you pay attention to detail and put value in quality music. Take the time to care for your system, and it will pay you back tenfold every time that first note drops. That is where vinyl truly sings.